Noise Animation
This rollout is used to further refine the selected noise pattern's look and motion over the course of the animation.
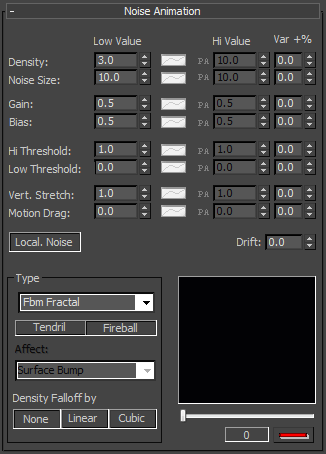
Density - This spinner controls the overall density or opacity of the volumetric puffs. It works in concert with the Density Falloff option in the Noise Shape Parameters rollout. Lower values produce more transparent puffs, while higher values produce, more solid, opaque puffs. This spinner can be animated over time via an AFC controller.
Noise Size - This spinner is used to control the overall size of the noise pattern. Larger values will produce bigger noise patterns, while smaller values produce smaller patterns. This spinner can be animated over time via an AFC controller.
The Size group of controls is where you define the overall look of the selected noise type you've picked. The controls that are available are dependent upon which noise type you've selected.
Gain - This spinner controls the overall contrast of the noise. The higher the value, the more contrast within the noise pattern. Likewise, the lower the value, the less contrast there will be within the noise pattern. This spinner's values go from 0.0 to 1.0 and can be animated over time via an AFC controller.
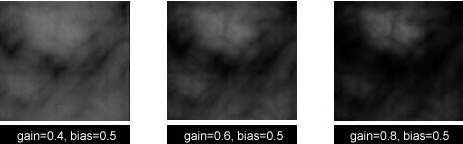
Note: If you change Gain from the default value of 0.5, additional rendering time is needed for computations.
If your volumetrics start with very high density and fade away at the end of the particle's life, you will probably experience a sharp transition. Use Gain along with the Density Falloff options to achieve a smoother transition.
Bias - This spinner controls the overall brightness of the noise patter. The higher the value, the brighter the noise pattern. Likewise, the lower the value, the dimmer the noise pattern. This spinner's values go from 0.0 to 1.0 and can be animated over time via an AFC controller.
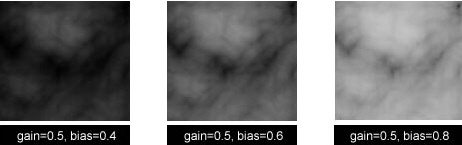
Note: If you change Bias from the default value of 0.5, additional time is needed for rendering computations. Bias is a great tool for shaping and defining the noise pattern when used along with Gain.
The Hi and Lo Threshold spinners control the grayscale range within the noise patterns. By default, that range extends from a Lo value of 0.0 to a Hi value of 1.0. If you set these spinners to values less than the defaults, you will effectively compress the dynamic range within the noise pattern.
Hi Threshold - Adjusting this spinner below it's default value of 1.0 will make the noise pattern look more solid. All changes you make to this spinner will be reflected in the Noise Preview window. This spinner can be animated over time via an AFC controller.
Lo Threshold - Adjusting this spinner above it's default value of 0.0 will make the noise pattern look more sparse. All changes you make to this spinner will be reflected in the Noise Preview window. This spinner can be animated over time via an AFC controller.
Vert. Stretch - The Vertical Stretch spinner controls how much the noise pattern will stretch along the World Z-axis. A value of 1.0 produces no stretch, while lower values will stretch the noise pattern vertically and higher values will compress the noise pattern vertically. All changes you make to this spinner will be reflected in the Noise Preview window. This spinner can be animated over time via an AFC controller.
Motion Drag - This spinner forces the noise pattern to move slower or faster than the actual particles when they are in motion. Positive values cause the noise to move faster, while negative values cause the noise to move slower. This spinner can be animated over time via an AFC controller.
Local. Noise - When turned on, the Localize Noise options forced the noise pattern to move with the volumetric puff. When turned off, the volumetric puffs move through the noise in World space.
Drift - The Drift spinner causes the noise pattern to move globally in the Z-axis direction. Higher values cause more drift in the noise pattern along the World Z-axis.
Type
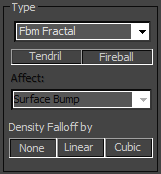
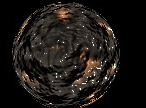
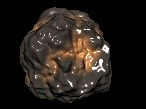
This group of controls is where you define which noise pattern you want to have applied to the AfterBurn volumetric puffs. There are seven different noise types to choose from. Each one has a distinct appearance and you can further refine the overall look of the noise with the Size group of controls above.
Type dropdown: Here is where you choose the noise pattern for your volumetric puffs. There are seven different noise types that you can choose from, and by turning on the Noise Preview window you can see what they look like prior to having to render out.
There are two ways to calculate the noise pattern. Beneath the Type dropdown are two options:
Fireball - When Fireball is selected, the noise pattern is generated normally.
Tendril - When Tendril is selected, the noise pattern is inverted, making it look more spiked.
Affect options are available only when you select the HyperSolids rendering type.
Surface Bump - When chosen, noise will affect only surface bump (very similar to the 3ds Max program's native Bump mapping.)
Surface Displacement - Displaces the surface (similar to what the 3ds max Displacement Space Warp does to a mesh.)
Density Falloff by radius: The density around the edges of the volumetric puff is controlled through these options.
- None - When None is enabled, there is no attenuation to the volumetric puff. This is the default setting and is generally quicker to render.
- Linear - The Linear option causes the actual values of noise/density to be calculated as an attenuated linear function from the center of puff shape to the radius. In other words, the further away from the center of the puff, the less dense the particle becomes.
- Cubic - The Cubic option causes the actual values of noise/density to be calculated as a smooth s-curve function from the center of the puff shape to the radius.
Noise Preview window
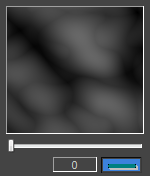
Like the Shape Preview window in the Particle Shape/Animation Parameters rollout, the Noise Preview window is used to view the noise pattern that is to be applied to the AfterBurn volumetric puffs.
Preview Window - The main preview window is activated by the lower button on the right (the small green bar - called the Interactive update button), and will display the overall noise pattern of your volumetric puff.
Note: The Preview does not show the precise look of the final rendered AfterBurn effects. Its purpose is to help you visualize how parameters affect Noise.
Within this window, you can right-click and drag to zoom in and out.
Frame slider - Directly beneath the preview window is a narrow slider where you can preview any animation set up via the AFCs within your AfterBurn effect. The current frame is displayed below.
Interactive update - This button enables the main Preview window.